If you’re into custom apparel, DTF transfers on T-shirts offer a versatile and vibrant way to bring designs to life. This beginner-friendly guide walks you through a reliable, repeatable workflow that preserves color fidelity, keeps the fabric soft to the touch, delivers durable, market-ready prints, and helps you scale your project from one-off designs to small runs. If you’re curious how to apply DTF transfers, follow clear steps from design prep to adhesion cure to ensure clean edges and consistent finishes. The article also covers DTF transfer steps, emphasizing even heat, uniform pressure across the surface, and a thoughtful cooldown to minimize edge lift and color shift. For broader context on materials and outcomes, you’ll explore fabric compatibility, pre-press strategies, and post-wash care that maximize longevity and keep graphics looking fresh after many cycles, regardless of design complexity.
Beyond the term direct-to-film, this approach to garment decoration uses a printable adhesive film that transfers artwork onto fabric with heat. By describing it as film-based transfers or adhesive-coated media, you capture the same process from a different angle while highlighting color fidelity and a soft hand. LSI-style phrasing connects related ideas such as substrate preparation, precise heat and pressure settings, and post-press care to ensure longevity across cotton and blends. Understanding these synonyms helps readers discover the method from different search terms while maintaining a clear, practical how-to narrative.
DTF transfers on T-shirts: Understanding the basics and why they matter
DTF transfers on T-shirts involve printing artwork onto a special film, coating it with adhesive powder, curing it, and then pressing it onto fabric with heat. This process delivers vibrant color and a soft hand, especially on cotton and cotton blends, making it a popular choice for custom apparel.
For anyone researching how to apply DTF transfers, knowing the basics helps you achieve reliable, repeatable results. This overview also touches on how DTF printing on T-shirts differs from other methods and why a well-understood workflow matters for color fidelity, durability, and wash performance.
Essential materials and equipment for successful DTF transfer projects
You’ll need a DTF printing film with the finished artwork (CMYK color profile recommended for accuracy), an adhesive powder designed for DTF transfers, and a heat press with precise temperature control and even pressure.
Other essentials include a teal or silicone release sheet, a parchment sheet for pressing protection, a clean flat surface for pre-pressing and cooldown, and cotton or cotton-blend T-shirts with minimal stretch. Having a test swatch to dial in temperature and time settings before larger runs aligns with best practices in how to apply DTF transfers.
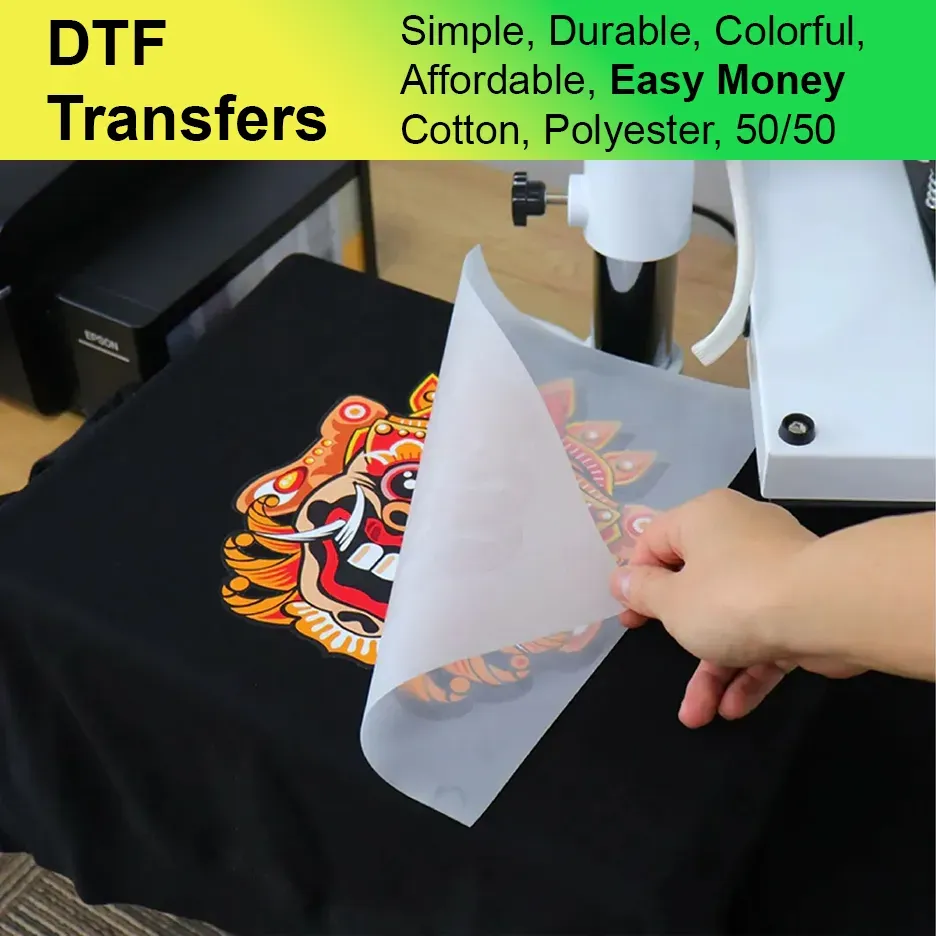
DTF transfer steps: A step-by-step guide to applying on T-shirts
Prepare the artwork and print by ensuring the design is vectorized or high-resolution raster art. Manage color carefully and print onto the DTF film using approved ink sets, then allow the print to dry completely before applying adhesive powder, which is a key step in DTF transfer steps.
Next, cure the powder-coated film and prepare the garment by pre-pressing to remove moisture and create a smooth surface. Align the transfer with precise positioning on the shirt and verify symmetrical placement before applying heat.
DTF heat press instructions: Temperature, time, and pressure for best results
Set the heat press to the recommended temperature for DTF transfers, typically around 300-320°F (150-160°C). Choose a pressing time in the 12-15 second range and apply firm, even pressure to ensure uniform adhesion.
Protect the print with a sheet, then manage the cooldown and peel method according to the film and powder you use. Following accurate DTF heat press instructions helps minimize edge artifacts and ensures a durable finish on the fabric.
Troubleshooting and quality control: common issues and fixes
Common issues include uneven adhesion, ghosting or color misalignment, and edges lifting. Address these by ensuring the garment is flat, pre-pressed well, and that the transfer has properly cured before peeling.
To maintain quality, calibrate color profiles, verify print quality, and perform test transfers on spare garments. If problems persist, consult DTF transfer troubleshooting steps and revisit temperature, time, and pressure settings to isolate the cause.
Care, durability, and long-term results for DTF prints on fabric
With proper curing and care, DTF transfers can endure many washes on 100% cotton garments or cotton blends. Wash inside-out in cold water and avoid high-heat drying to preserve color and hand feel.
To maximize longevity, condition the print with a brief post-press cooldown, store films and powders properly, and test on different garment weights. As you gain experience with DTF printing on T-shirts, you’ll better predict performance and maintain a soft, flexible finish.
Frequently Asked Questions
What are the DTF transfer steps for applying DTF transfers on T-shirts?
A typical DTF transfer steps workflow includes printing the design onto the DTF film with proper color management, curing the adhesive powder, pre-pressing the garment, aligning the transfer, heat pressing at about 300–320°F (150–160°C) for 12–15 seconds with even pressure, performing a warm or cold peel as required, and allowing a cooldown plus any recommended post-press curing. Always run a test on a spare garment to dial in temperature and time before a full run.
How to apply DTF transfers on T-shirts correctly?
To apply DTF transfers on T-shirts correctly, start with prepared artwork, print on the DTF film and ensure the print is dry, apply and cure the adhesive powder, pre-press the shirt, align the transfer precisely, press with a heat press at the recommended temperature (around 300–320°F) and time (12–15 seconds) with even pressure, perform a warm or cold peel as advised, then cool and complete any post-press curing if required.
What are the DTF heat press instructions for DTF transfers on T-shirts?
DTF heat press instructions typically call for a temperature of 300–320°F (150–160°C), a press time of about 12–15 seconds, and firm, uniform pressure. Use protective sheets, ensure the garment is flat, and follow your film and powder manufacturer’s guidance. Always perform a test on a spare garment to fine‑tune settings before production.
What is involved in DTF printing on T-shirts and how can I troubleshoot common issues?
DTF printing on T-shirts involves printing with CMYK inks onto a DTF film, applying adhesive powder, curing, and transferring with a heat press. For troubleshooting, check color management and print fidelity, confirm the adhesive has cured, ensure even powder coating, verify proper heat and pressure, and inspect the garment for prep issues or misregistration before transferring.
What are common mistakes in DTF transfer steps on T-shirts and how can I avoid them?
Common mistakes include uneven adhesion from wrinkles or poor pre-press, ghosting or color misregistration from improper color profiles, and edge lifting from over-pressing or insufficient curing. Avoid them by flat pre-pressing the garment, calibrating color profiles, testing on spare garments, ensuring full cure of the adhesive, and applying consistent, even pressure during the transfer.
Are DTF transfers on T-shirts durable and how should I care for them?
Yes, when properly cured and cared for, DTF transfers on T-shirts are durable for many wash cycles. To maintain longevity, wash inside-out in cold water, avoid high-heat dryers, and follow any care instructions from your film or ink manufacturer. Proper curing and using compatible fabrics (like 100% cotton or cotton blends) also help keep colors vibrant and the print flexible.
| Topic | Key Points |
|---|---|
| What is DTF transfer? | Direct-to-film (DTF) transfers involve printing artwork onto a special film, applying adhesive powder, curing, and transferring to fabric with a heat press to produce vibrant, soft prints on cotton and cotton blends. |
| What you need |
|
| Quality factors |
|
| Step-by-step workflow (summary) |
|
| Settings and testing |
|
| Common mistakes |
|
| Durability and care tips |
|
| DTF vs other methods |
|
| Troubleshooting quick reference |
|
| FAQs |
|