DTF transfers for apparel have transformed how small businesses, makers, and hobbyists approach custom garments. This guide introduces the DTF transfer process, highlighting how it delivers flexibility, durability, and ease of use for beginners, making multi-color designs accessible without the setup burdens of traditional methods. By outlining practical steps from concept to final result, you can dial in DTF heat press settings to suit cotton, blends, and even dark fabrics while preserving color fidelity and soft hand feel. The approach emphasizes design quality, proper curing, and careful garment preparation so you can achieve clean edges, reliable adhesion, and consistent output across batches, while troubleshooting common issues becomes a systematic part of your routine. With reliable gear, a measured testing routine, and attention to fabric compatibility, you can create vibrant prints that stand up to wear and washing, scale your operations, and build confidence with every run while keeping costs manageable.
Beyond the shorthand DTF language, this is a film-based garment printing approach that relies on printed imagery on a clear PET sheet, followed by powder adhesive and heat to fuse the design to fabric. Think of it as a direct-to-film workflow or a digital transfer-on-film technique that shares the same end goal as standard heat transfers. The method emphasizes printer resolution, color management, and precise timing, but invites experimentation with fabrics, underbases, and finishing steps to optimize opacity and feel. In practical terms, you’re applying a decorative film that carries the ink and a compatible adhesive, then heat-pressing it onto tees, hoodies, and other textiles for durable, eye-catching results.
Understanding the DTF transfer process: a beginner-friendly roadmap
Understanding the DTF transfer process begins with a clear plan from concept to finished garment. Direct-to-film printing involves printing a design onto a PET film, sometimes with a white underbase for darker fabrics, then curing and applying an adhesive powder. After the powder sets, the film is pressed onto the textile to transfer the image. Grasping this sequence helps beginners anticipate timing, temperature, and handling steps that affect adhesion and edge sharpness.
For those exploring DTF printing for beginners, the process offers a forgiving yet precise path to vibrant, multi-color designs without screen-making or messy color separations. By following a consistent DTF transfer process and documenting results, you can reproduce professional results across batches and fabrics, even in small runs.
DTF printing for beginners: gear, fabrics, and setup essentials
Setting up for DTF printing for beginners means choosing reliable components that deliver consistent results: a capable printer with suitable resolution, quality DTF film, a compatible adhesive powder, a heat press, silicone cover sheets, and a rack to keep items flat during curing. Investing in these basics reduces common issues such as misregistration or incomplete adhesion. Understanding fabric compatibility—cotton and cotton blends usually respond best—also helps you plan your workflow.
Before committing to large runs, test on swatches and keep notes. The DTF transfer process becomes clearer as you compare how different fabrics respond, how the white underbase affects vibrancy on dark fabrics, and how edge definition holds up after washing.
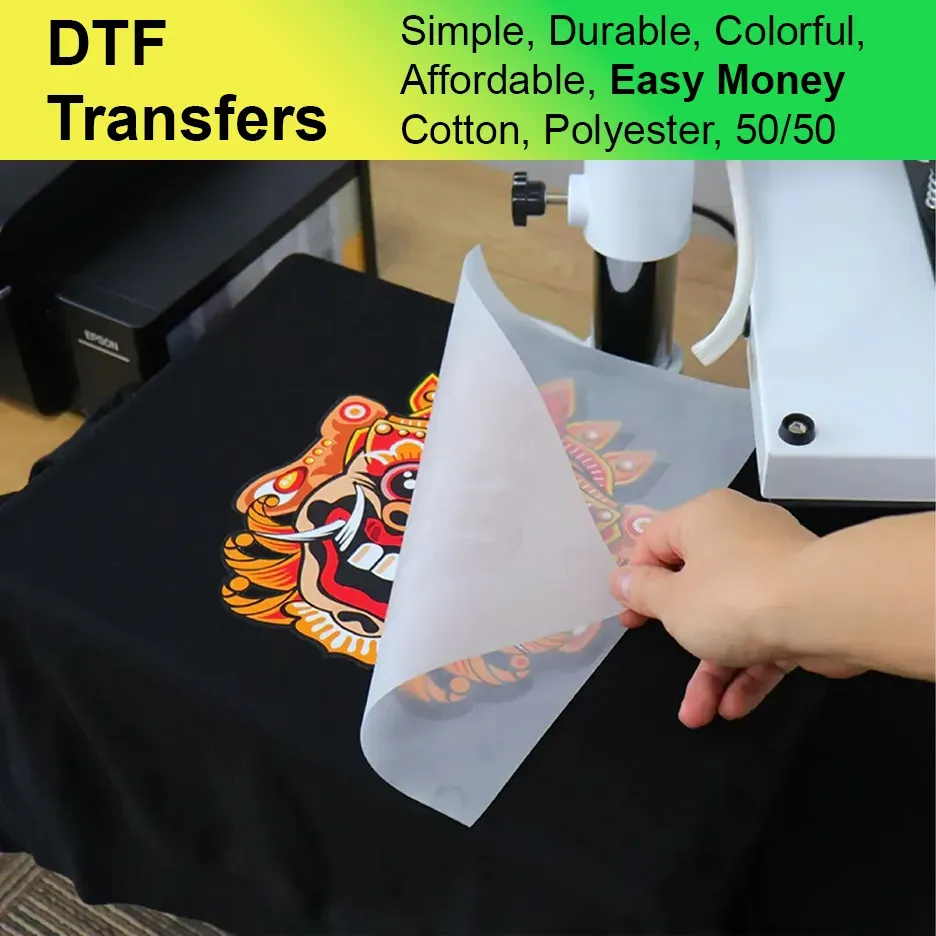
How to apply DTF transfers: from design to garment
Begin with a design sized to fill your printable area, ensuring clean edges. In this step of the how to apply DTF transfers process, you may mirror the image for appropriate substrates and print with a potential white underbase if needed. Printing on DTF film should produce a sharp image with strong color, gradients, and fine details when using a color-managed workflow.
After printing, cure the film and apply the adhesive powder evenly, brushing away excess before a second cure. Prepare the garment by pre-washing, removing lint, and aligning the print. Then press with medium to firm pressure at the recommended temperature and time, let cool briefly, and peel the film to reveal the transfer.
DTF heat press settings: temperature, time, and pressure guidelines
Optimal DTF heat press settings vary by fabric, but a solid starting point is 305–325°F (150–165°C) for 12–20 seconds with medium to firm pressure. These DTF heat press settings help transfer the film and adhesive onto the garment while preserving color detail. Always perform a test patch when trying a new fabric or powder to verify adhesion and edge quality.
Fine-tuning and calibration are essential. Use a calibrated thermometer to check platen temperature across the surface, and ensure even pressure with a flat, uncluttered platen. For different substrates, you may adjust dwell time, transfer orientation, and post-press handling to reduce edge lifting and improve wash durability.
DTF transfers for apparel vs screen printing: choosing the right method
DTF transfers for apparel deliver full-color, high-resolution prints with strong adhesion across a variety of fabrics, making them appealing for small runs and on-demand designs. Compared with screen printing, DTF avoids separate color separations and setup for each color, enabling rapid prototyping and batch versatility.
For beginners evaluating methods, consider project size, fabric type, and desired finish. Screen printing can be cost-effective for large runs but requires more upfront work and minimums, whereas DTF printing for beginners supports quick design iteration and reuse of designs across different garments and colors.
Choosing fabrics and testing for durable DTF results
Successful DTF transfers depend on fabric compatibility. Natural fibers like cotton deliver bold color and crisp edges, while synthetic blends may require different underbase strategies. Dark fabrics often benefit from a white underbase to maintain vibrancy, and high-pile fabrics can present lift risk without additional support. Always test on actual garments to gauge color fidelity, stretch resistance, and surface feel.
Best practice is to pre-wash, keep lint-free surfaces, and run controlled tests, documenting time, temperature, and pressure for each fabric. As you accumulate results, you will refine your process and build a reliable workflow that scales from one-off designs to small batches.
Frequently Asked Questions
What is the DTF transfer process for apparel and why is it beginner-friendly?
DTF transfer process for apparel starts with printing the design onto a PET film using a water-based adhesive powder, then curing the ink, applying powder, baking, and finally pressing the film onto fabric. The result is a vivid, durable print that works on cotton, polyester blends, and dark fabrics with minimal color loss. For beginners, DTF transfers offer flexibility without screen-printing setups, enabling quick, multi-color designs with reliable results across batches.
How to apply DTF transfers: a step-by-step guide for beginners?
Steps: 1) Design and print: use a color-managed workflow, mirror as needed, print with a white underbase if required, and ensure sharp edges. 2) Cure and apply powder: cure briefly, apply adhesive powder evenly, brush off excess, and cure again. 3) Bake or cure: a short bake to dry the powder. 4) Prepare the garment: pre-wash, place a cover sheet, align the print, remove lint. 5) Transfer: place film on fabric with printed side down, press at 305–325°F (150–165°C) for 12–20 seconds with medium to firm pressure, then cool and peel. 6) Post-press curing: optional second press for better adhesion.
DTF heat press settings: what temperatures and times work best?
Typical DTF heat press settings are 305–325°F (150–165°C) for 12–20 seconds with medium to firm pressure. Adjust the time and temperature based on fabric thickness and whether a white underbase is needed. Ensure even heat distribution with a silicone sheet or cover to protect the garment.
DTF printing for beginners: what gear do you need to start?
A solid starting setup includes a reliable high-resolution printer, DTF film and adhesive powder, a heat press, a silicone or protective cover sheet, a small rack or press board, and a calibrated thermometer. Use a reputable DTF kit, pre-wash fabrics, and test on sample patches to establish consistent results before expanding to more fabrics.
DTF transfers for apparel vs screen printing: which method is best for small runs?
DTF transfers for apparel are typically the better choice for small runs because they offer full-color capability, no minimum orders, and quicker setup. Screen printing can be more cost-effective for large runs but requires color separations and longer setup times. The right choice depends on project size, fabric type, and desired finish.
DTF transfers for apparel troubleshooting: how to fix common issues?
Common issues include peeling edges, cracking, white halos, fading colors, and misregistration. Troubleshoot by ensuring proper underbase and curing, correct powder application, appropriate press time and temperature, and stable placement using registration marks or tape. Run a test on the actual garment to verify adhesion, color accuracy, and alignment before large batches.
| Aspect | Key Points |
|---|---|
| What are DTF transfers for apparel | DTF stands for Direct To Film. Designs are printed on PET film with a water-based adhesive powder, cured, then pressed onto fabric to yield a vivid, durable print. Works on cotton, polyester blends, and dark fabrics with minimal color loss. |
| Why choose DTF transfers for apparel | Forgiving process with full-color capability (including gradients) and quick small runs. No minimum orders or separate color separations; cost per unit can improve with volume; stock can be reused for multiple designs. |
| Key components for starting out | Printer capable of sharp, high-resolution output; DTF film and adhesive powder; heat press; protective cover sheet; rack/press board for even pressure; correct temperature and time settings; lint-free fabric. |
| DTF transfer process step by step | Design and print with color management (mirror image if needed); cure and apply powder; bake or cure; prepare the garment; transfer with heat press at ~305–325°F (150–165°C) for 12–20 seconds; cool and peel; consider a post-press cure if needed. |
| Materials and equipment basics for beginners | Starter DTF kit (film, powder, transfer sheet); reliable heat press with even heat distribution and accurate temperature control; calibrated thermometer to verify surface temperature; lint-free substrates. |
| Selecting fabrics and understanding compatibility | DTF works with many fabrics. Natural fibers like cotton yield bold colors; blends and dark fabrics may require a white underbase. Always test on the actual garment; avoid high-pile or knit textures without extra support. |
| Best practices for beginners | Start with standard cotton tees to learn the process; work on clean, lint-free surfaces; calibrate the heat press; design with clean edges and consider white underbase for dark fabrics; use protective sheets; ensure full cure before pressing; test on new garments. |
| Troubleshooting common issues | Peeling edges: ensure proper underbase and cure time; cracking: check pressure and heat duration; white halos: verify even powder application and correct pressing; fading: monitor color management; misregistration: keep film aligned with registration marks and tape. |
| DTF transfers vs other methods | DTF delivers full-color, high-resolution prints with strong adhesion across fabrics. Screen printing may be cheaper for large runs but needs color separations and longer setup; sublimation works best on polyester and light-colored substrates. |
| Maintaining quality and extending life | Clean the pressing surface; store powders in a cool, dry place; keep consistent print settings; periodically check temperature calibration and pressure; maintain equipment. |
| Scaling up and sourcing supplies | Stock additional films and powders; have backup heat pressing surfaces; evaluate different film finishes (glossy, satin, matte); compare price per transfer and print consistency when choosing suppliers. |
Summary
DTF transfers for apparel offer a practical, accessible path for beginners who want vibrant, durable designs on a range of fabrics. By understanding the transfer process, investing in reliable gear, and following best practices, you can create professional-looking garments with confidence. Start with simple designs, test across fabrics, and iterate based on results. Over time, you will master the art of applying DTF transfers and build a solid line of products that resonates with your audience.